How to use the Post section
Now that we have covered the Dashboard section on how to use WordPress, we will be moving on to how to use the Post section.
The Post section is where you will probably be spending much of your time on WordPress. This section allows you to create, edit, update posts.

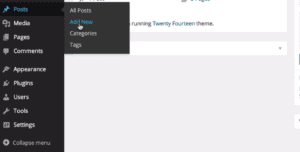
To create a new post navigate to the sidebar on your left-hand side hover over the Post option and select add new. After clicking on add new, you will see the post editor.
Start naming your post by adding a title in the title box. Next is the text editor where you can write all of your content or paste it in from another document.
When you are happy with the text editing, navigate to the right side of your screen. There you will see a button that says Preview. Clicking this button will open another page where you may see how your content will look like if you publish it.
Long posts may fatigue you, and you might want to take a break. To do so without losing your written content, you can click on the save draft situated on the right-hand side of the screen. This will enable you to keep your post for later editing.
Hitting the Publish button will officially release your post to the public.
In this article we learned how to:
- Add a new post
- Naming that post
- where to write or paste your content
- Previewing your post before publishing it
- Saving your post
- Publishing your post for the public to see
We will continue the “how to use the Post section” tutorial on other articles on our “how to use WordPress” series.
Don’t hesitate to contact us and get a free consultation for your website today.


